
WordPress theme development tutorial step by step
WordPress is the best cms for blog type or to make a simple dynamic site, so in this WordPress theme development tutorial we will learn how to make a wp theme from the scratch step by step from an HTML file and which is installable to any WordPress site,
The steps of the WordPress theme development tutorial

The steps of the WordPress theme development tutorial
The first step is to install WordPress
install WordPress by following the steps described below, the first step of WordPress theme development tutorial is installed WordPress.
- download WordPress from the wordpress.org website and then
- turn on your local server and MySQL to install in localhost or login to your Cpanel to install in a server,
- create a database with database name, username, password, and hostname
- place the unzipped downloaded folder to your host folder (if you are using localhost and xampp then it will be htdocs, if you are using wamp then it will be www or if you are using server then place it to public HTML folder)
- now run the project in the browser
- now install the downloaded WordPress by entering the field data.
To read in details click here….
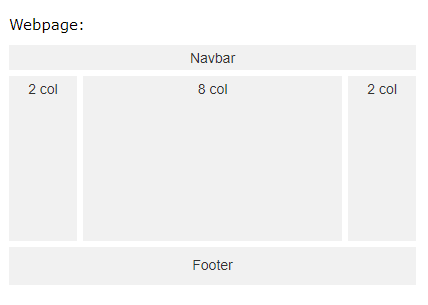
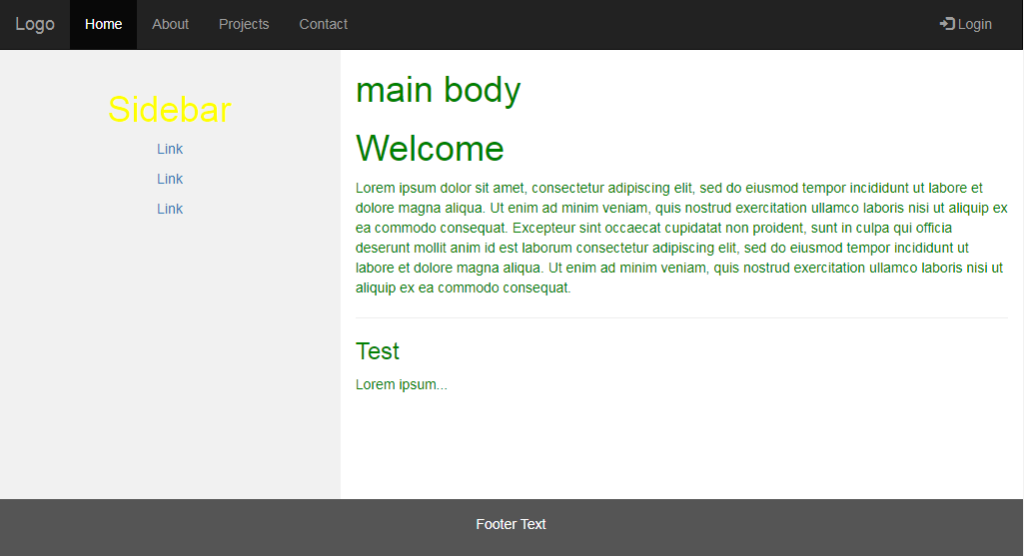
The second Step divide the HTML files
To develop a WordPress theme from HTML first need a HTML template which have to convert into WordPress theme and for that get the HTML files with CSS, js, images files and folder and copy them and then go to your project folder and create a folder and rename it according to your theme name and paste the copied filed inside it. its the second step of the WordPress theme development tutorial.
split HTML
- after pasting the files,
- open the home page in an HTML or code editor,
- select the common portion for header, footer and sidebar,
- then create 4 files in your theme folder and give name as header.php, footer.php, sidebar.php, and index.php,
- paste the header portions HTML to the header.php file,
- similarly, paste the footer portions HTML to the footer.php file
- and paste the sidebar portions HTML to the sidebar.php file
- and paste the rest of the HTML portion to index.php file,
- now get the header by gate header(); function,
- get footer by using get_footer() function
- and get sidebar by calling function get_sidebar(); inside <?php ?> tag
To read in details click here….
Third, make style.css file to define the theme
in this WordPress theme development tutorial in this part, we are going to learn about theme defining file. If we logged in to the admin panel we will see that there is a broken theme as to make a WordPress there should be at the index.php file and a style.css file in your theme folder, the style.cc file is used to define a WordPress theme so lest start create a theme style file
- first, create a style.css file in your theme folder,
- make a comment portion and rite there the below code
- /* Theme Name: Twenty Fifteen Theme URI: https://wordpress.org/themes/twentyfifteen/ Author: the WordPress team Author URI: https://wordpress.org/ Description: Our 2015 default theme is clean, blog-focused, and designed for clarity. Twenty Fifteen’s simple, straightforward typography is readable on a wide variety of screen sizes, and suitable for multiple languages. We designed it using a mobile-first approach, meaning your content takes center-stage, regardless of whether your visitors arrive by smartphone, tablet, laptop, or desktop computer. Version: 1.6 License: GNU General Public License v2 or later License URI: https://www.gnu.org/licenses/gpl-2.0.html Tags: blog, two-columns, left-sidebar, accessibility-ready, custom-background, custom-colors, custom-header, custom-logo, custom-menu, editor-style, featured-images, microformats, post-formats, rtl-language-support, sticky-post, threaded-comments, translation-ready Text Domain: twentyfifteen */
- do not change the text of the left side of colon they are used as keyword example Theme Name must not be changed,
- change the right side content of colon as twenty fifteen
- and you have done a theme style.css
To read in details click here….
Fourth make theme functions file
The fourth step of the WordPress theme development tutorial is making a theme function. The theme functions are used to write all the functions to be used only for the theme like to include a script to frontend or backend we can use functions.php file or define menu, dynamic sidebar, or custom post we are using to use WordPress theme function.php file.
- open your theme folder,
- create a PHP file and give its name as functions.php
To read in details click here….
Fifth make screenshot.png file for theme featured image
Again if you log in to the admin panel and visit the appearance -> theme you can be able to find your theme but there is no image like other default theme showing and to make that featured image need to follow the steps
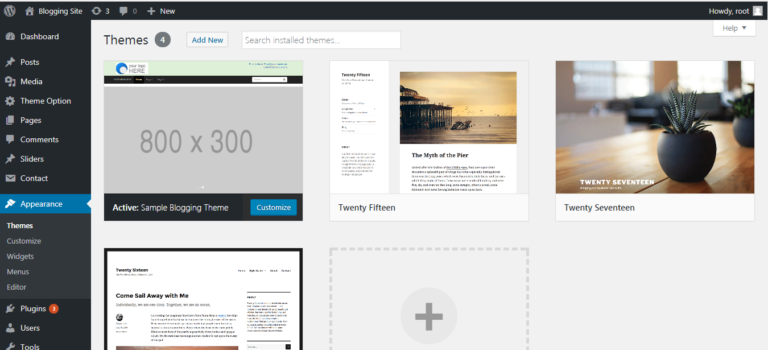
- take a screenshot of your HTML design,
- save the image in png format,
- rename the file to screenshot.png,
- move the screenshot.png file in your theme folder
- and you have done it.
To read in details click here….
Sixth make a theme options page for logo, social media, copyright note, etc.
Of any WordPress theme development tutorial, a vital point is theme option page developers use to find any plugin or code to make theme option but here is a very easy method to make a theme options page from your function.php file by writing some functions and hooks. for that follow the steps and for details click on the link provided below.
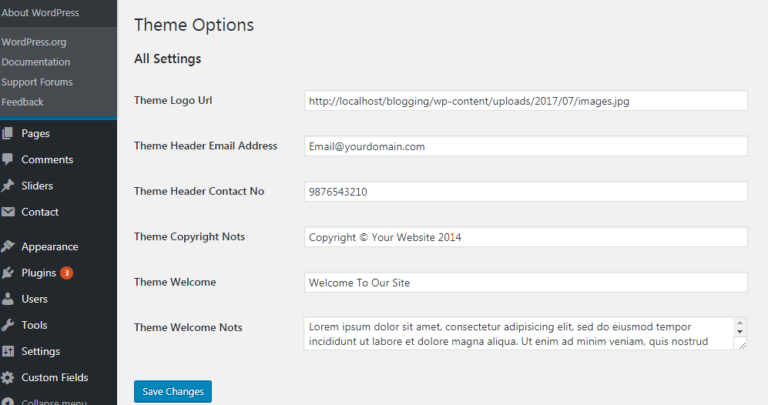
Theme Option Panel
- Create a menu and page in WordPress admin panel following the below code.
- Now declare the function and basic HTML and code, called by the declaration of the theme option menu
- Initialize the display of the field,
- make the field functional
- there are a details link and sample code for theme option page
//call the function for admin menu
add_action("admin_menu", "add_theme_menu_item");
//called function by admin menu
function add_theme_menu_item()
{
$page_title       = 'Theme Option Page';
$menu_title       = 'Theme Option';
$capability       = 'manage_options';
$menu_slug        = 'theme-panel';
$function_to_call = 'theme_settings_page';
$icon_url         = null;
$position         = 12;
add_menu_page($page_title, $menu_title, $capability, $menu_slug, $function_to_call, $icon_url, $position);
}

//The function to call from the time of adding admin menu
function theme_settings_page(){
?>
<div class="wrap">
<h1>Theme Options</h1>
<form method="post" action="options.php">
<?php
//giving the id of the field area
settings_fields("section");
do_settings_sections("theme-options");
submit_button();
?>
</form>
</div>
<?php
}

//call the function for admin init
add_action("admin_init", "display_theme_panel_fields");
//called function by admin init
function display_theme_panel_fields()
{
add_settings_section("section", "All Settings", null, "theme-options");

//adding the secrtion of logo url
add_settings_field("theme_logo_url", "Theme Logo Url", "display_theme_logo_element", "theme-options", "section");
//registering the secrtion of logo url
register_setting("section", "theme_logo_url");

//adding the secrtion of Header Email Address
add_settings_field("theme_header_email", "Theme Header Email Address", "display_theme_header_email", "theme-options", "section");
//registering the secrtion of Header Email Address
register_setting("section", "theme_header_email");
}
//display the section for logo url
function display_theme_logo_element()
{
?><input type="text" name="theme_logo_url" id="theme_logo_url" value="<?php echo get_option('theme_logo_url'); ?>" style="width:100%;"/><?php
}
//display the section for Header Email Address
function display_theme_header_email()
{
?><input type="text" name="theme_header_email" id="theme_header_email" value="<?php echo get_option('theme_header_email'); ?>" style="width:100%;"/><?php
}
To read in details click here….

The steps of the WordPress theme development tutorial
Seventh create the theme header portion dynamic
in WordPress the theme header must have to configure properly for the uses for SEO and title charset and language also to get the theme style WordPress default code for header and for pingback URL and for that to follow the below instructions:
- The code or function is
<html <?php language_attributes(); ?>>used in the starting HTML tag for the language of the site. <meta charset="<?php bloginfo( 'charset' ); ?>">is used to get the HTML default charset.<title><?php wp_title ( '' ); if (is_home ()) { bloginfo ( 'name' ); echo ' - '; bloginfo ( 'description' ); } ?></title>is used to get the page title according to the site name and page name and description.<link href="<?php echo get_stylesheet_uri(); ?>" rel="stylesheet" />is used for getting the theme defining style.css file which is located in the theme root folder.<link rel="pingback" href="<?php bloginfo( 'pingback_url' ); ?>">is used to get the pingback URL<?php wp_head(); ?>is used to get the default header portion as CSS some js of WordPress.<?php body_class(); ?>is used to define the unique body class for each page it also generated some default classes of WordPress body.- To include the other CSS located in the theme directory include theme style.css which is located in the root directory of the theme defining the theme. Or place
<?php echo get_bloginfo ( 'template_url' ) . '/' ?>to give the theme URL or its links.
To read in details click here….
No Eight Have to make the theme menu dynamic
main nav menu is the most important part of a website and in a WordPress theme there should be a dynamic nav menu so in this part of WordPress theme development tutorial we will learn how to develop a dynamic menu in WordPress and for that follow the steps and you can read details from below link
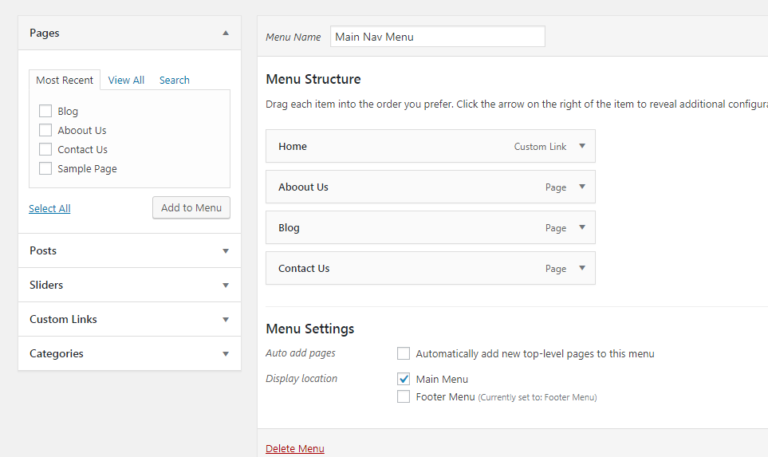
Theme Menu
- first, declare the menu in theme function
-
//To register nav menu function register_my_menus() { $menu_args = array( 'main_menu' => __( 'Main Menu' ), 'footer_menu' => __( 'Footer Menu' ) ); register_nav_menus($menu_args); } add_action( 'init', 'register_my_menus' ); - then call the menu from the frontend code by using the function
-
<?php
//The Arguments of the menu
$args = array(
'menu' => '',
'container' => 'div',
'container_class' => '',
'container_id' => '',
'menu_class' => 'menu',
'menu_id' => '',
'echo' => true,
'fallback_cb' => 'wp_page_menu',
'before' => '',
'after' => '',
'link_before' => '',
'link_after' => '',
'items_wrap' => '<ul id="%1$s" class="%2$s">%3$s</ul>',
'item_spacing' => 'preserve',
'depth' => 0,
'walker' => '',
'theme_location' => 'main_menu'
);

//to display the menu
wp_nav_menu( $args );
?>
To read in details click here….
Nine Declare theme footer
in theme footer, we have to call the default code of WordPress for the footer as there are many plugins and WordPress itself sending many script and code through the footer and for that before ending body tag use the code <?php wp_footer(); ?>
Dynamic Footer
To read in details click here….
Tenth Declare sidebar with a widget
through the WordPress theme development tutorial we will make many sidebars for footer and sidebar and for that we need to go to the functions.php file and declare a sidebar first and then have to call the sidebar in frontend so do that step by step
Dynamic Sidebar
- declare sidebar in functions.php file
-
//To Register a sidebar function theme_slug_widgets_init() { register_sidebar( array( 'name' => __( 'Main Sidebar', 'theme-slug' ), 'id' => 'sidebar-1', 'description' => __( 'Widgets in this area will be shown on all posts and pages.', 'theme-slug' ), 'before_widget' => '<li id="%1$s" class="widget %2$s">', 'after_widget' => '</li>', 'before_title' => '<h2 class="widgettitle">', 'after_title' => '</h2>', ) ); } add_action( 'widgets_init', 'theme_slug_widgets_init' ); - call the sidebar in the front end
-
<?php if ( is_active_sidebar( 'sidebar-1' ) ) : ?>
<ul id="primary-sidebar" class="primary-sidebar widget-area" role="complementary">
<?php dynamic_sidebar( 'sidebar-1' ); ?>
</ul><!-- #primary-sidebar -->
<?php endif; ?>
To read in details click here….
Eleventh make a custom post type for the slider or testimonials or any repeater type post
in WordPress development the custom post type is very important and using that we can create many admin post type menu and fetch them to the front end and for that follow the steps
- first, declare the custom field of functions.php file
-
function custom_slider_init(){ $labels = array( 'name' => ' Sliders', 'singular_name' => ' Slider ', 'menu_name' => ' Sliders', 'name_admin_bar' => ' Slider ', 'add_new' => 'Add Slider ', 'add_new_item' => 'Add New Slider ', 'new_item' => 'New Slider ', 'edit_item' => 'Edit Slider ', 'view_item' => 'View Slider ', 'all_items' => 'All Sliders ', 'search_items' => 'Search Sliders', 'parent_item_colon' => 'Parent Sliders', 'not_found' => 'No Sliders found.', 'not_found_in_trash' => 'No Sliders found in Trash.' ); $args = array( 'labels' => $labels, 'description' => __( 'Description.', 'your-plugin-textdomain' ), 'public' => true, 'publicly_queryable' => true, 'show_ui' => true, 'show_in_menu' => true, 'query_var' => true, 'rewrite' => array( 'slug' => 'sliders' ), 'capability_type' => 'post', 'has_archive' => true, 'hierarchical' => false, 'menu_position' => null, 'supports' => array( 'title', 'editor', 'excerpt', 'author', 'thumbnail', 'comments', 'revisions', 'post-formats', 'custom-fields' ) ); register_post_type( 'custom_slider', $args ); } add_action( 'init', 'custom_slider_init' ); - then fetch the custom post types post in frontend
-
//the argument for the post
$args = array(  'post_type' => 'product'    );

//passing the argument through query post
query_posts( $args );

// if there is post go inside if loop
if ( have_posts() ):
//fetch the cumber of posts
while ( have_posts() ) :
the_post();

// Do stuff with the post content.
the_title();
the_permalink();
the_content();
the_excerpt();
echo wp_get_attachment_url( get_post_thumbnail_id($post->ID) );
echo get_the_category_list();
endwhile;
else:
// Insert any content or load a template for no posts found.
endif;
// reset the query for the other posts have declared and to be declare
wp_reset_query();
To read in details click here….

The steps of the WordPress theme development tutorial
12ve Make a page template
now develop a page template for the WordPress theme, it will be used as a default page template to call any page, that is if you have not selected any custom page template for the page it will display through the page.php file now let us make it step by step

Single custom post
- first, create a PHP file in your theme folder and give its name page.php the name spelling must have to page.php
- Then to get the header to write the code get_header();
- and to get the footer portion to write the code get_footer()
- and then write the code get_sidebar(); to get the sidebar in its position
- write if(have_posts()): the_post(); endif to get the post data
- now get the page title and print it by using the_title(); code
- and get the content by using the_content(); code
- and you can use the code echo wp_get_attachment_url( get_post_thumbnail_id($post->ID) ); to print the thumbnail image URL
To read in details click here….
13th Make a single template template
the single.php file is used to show WordPress posts and for that, we need to flow some step
first, go to the theme folder and create a PHP file by name single.php
then follow the process of page development
To read in details click here….
14th Make custom post and page template
to develop a WordPress theme sometime we need to make a different page and post with a different design so we need to create custom post and page template
to develop a custom page template in WordPress
- go to your theme folder and create a PHP file give it any name and inside PHP tag in comment declare its name
- <?php /* * Template Name: Contact Us */ ?>
- and then follow the normal page creation steps
To read in details click here….
to develop a custom post template in WordPress
- go to your theme folder and create a php file give it post-<post-slag>.php name
- and then follow the normal page creation steps
To read in details click here….
15th Now develop a search page
in WordPress theme development a search page is very important as someone search from search form it will show all related website data and for that
- go to your theme folder and create a PHP file by name search.php
- and then write a loop if(have_posts()): while(have_posts()): the_post(); endwhile; endif;
- and inside the while loop, you can follow the steps of page or post creation to get the title content and image
- and you can also get the header, footer, and sidebar by following the page or post-development
To read in details click here….
16th Make a custom archive page template
an archive page is displaying the date wise or category wise data and to make an archive page and as archive page took a vital place so we have made another post for that in the WordPress theme development tutorial.
- first, go to your theme folder and make a PHP file by name archive.php
- and then follow the steps of search page development
To read in details click here….
17 now make a 404.php page
if any URL is not found in your site then WordPress uses to display the 404.php file and to make a 404.php file
- go to your theme folder and create a php file and give its name 404.php
- now get the header, footer, and sidebar
- and write 404 pages not found
WordPress theme development tutorial step by step from the scratch at a glance
To develop the WordPress theme there is needed 13 mandatory files and they are as described below. and we have discussed through the WordPress theme development tutorial
- functions.php
- index.php
- style.css
- screenshot.png
- header.php
- footer.php
- page.php
- single.php
- sidebar.php
- archive.php
- commentform.php
- search.php
- and 404.php
the functions of the above pages at a glance which we have seen through the WordPress theme development tutorial step by step from the scratch
Now going to tell you the uses of mandatory fields
the page functions.php is used to writing the functions of the page like the custom post, define menu, make theme support for thumbnails, declare side menu, etc.
The page index.php is used as a default front page will show id a static front page is not defined.
The page header.php is used as a header to call on every page.
The page footer.php is used as a footer to call on every page.
The file page.php is used as a default page template if you want to use some different page template then you have to create a page template.
The file single.php is used as a template to show single posts.
sidebar.php file is used as a sidebar can be called from any pages.
The file archive.php is used as a template to show the category or date wise posts.
The file commentform.php is used to make a comment form and showing comments.
The page file search.php is used to show the searched posts or pages.
And if not a page or post is found in URL then 404.php file is called as a template
The file style.css is used to define a theme name, version, descriptions, author name, theme URL, author URL, etc.
screenshot.png file is used to show the graphics view at the admin panels theme section.

The steps of the WordPress theme development tutorial
I hope that the WordPress theme development tutorial step by step from the scratch post helped you to make a WordPress theme and you have learned to develop WordPress. and for any query, you can comment below. I have given all the details page link in each portion for WordPress theme development please go there and read in details.
Thanks for Reading